Table of Contents
ToggleThe brick manufacturing process involves four main stages: preparation of soil, moulding, drying, and burning. Each stage plays a crucial role in producing high-quality bricks.
Preparation of Soil for Brick Manufacturing
The preparation of soil for brick manufacturing involves several essential steps to ensure the clay is suitable for high-quality brick production. Here’s a breakdown of each stage:
Removal of Top Soil
The process begins by removing the top layer of soil, approximately 200 mm deep. This layer contains impurities that could compromise brick quality, so it is discarded and not used in the brick-making process.Digging and Spreading
After the topsoil is cleared, the underlying soil is excavated to a further depth of around 200 mm. This soil is then spread evenly on level ground, forming clay heaps about 600 to 1200 mm high.Cleaning
The spread soil is cleaned to remove unwanted materials, such as stones, pebbles, and organic matter. If there is an excess of non-clay substances, the clay may need to be washed and screened, though this can be labor-intensive and costly. Any soil clumps are broken down into fine particles to improve the soil’s consistency.Weathering
The cleaned soil is exposed to natural weather conditions for several weeks, depending on the soil type. This exposure allows the soil to soften, enhancing its plasticity and strength, which are critical for moulding bricks.Blending
To enhance the soil’s quality, materials such as sandy or calcareous clays may be mixed in specific proportions. Small amounts of coal or ash can also be added. The entire mixture is thoroughly blended and moistened with water to achieve a uniform consistency, preparing it for the moulding stage.Tempering
Tempering is the process of thoroughly mixing and kneading soil with water to achieve a stiff, uniform consistency. This is essential for producing high-quality, durable bricks.
Manual Tempering: For handmade bricks, workers or cattle knead the soil after adding around 25-30% water, forming a soft plastic clay suitable for moulding. This method is commonly used in smaller-scale or traditional brick-making operations.
Mechanical Tempering (Pug Mill): For large-scale production of high-quality bricks, soil is tempered in a pug mill. A pug mill is a specialized mechanical device consisting of a truncated conical tub, about 120 cm in diameter at the top, 75 cm at the base, and 180 cm in height. A central vertical shaft, equipped with horizontal arms and cutting knives, breaks up clay lumps and ensures thorough mixing. The shaft is rotated by either bullocks or electric power, depending on availability.
- Operation of the Pug Mill: Clay and water, in a ratio of 1:0.75, are fed from the top, and the mixture is kneaded as the central shaft rotates. The tempered clay is then collected from an outlet at the base. A pug mill of this size can process enough soil to produce about 20,000 bricks per day, making it ideal for large-scale brick manufacturing.
Tempering ensures that the clay is consistent and well-prepared, which is crucial for producing strong and uniform bricks.
Want to practice MCQs on Bricks & Clay Products?
Build up your knowledge from bricks to tiles with our comprehensive set of multiple-choice questions.

Moulding of Bricks
Moulding is the process of shaping bricks from tempered clay. This can be done either by hand or machine, depending on scale and requirements. Bricks are produced in traditional sizes in inches and metric sizes in centimeters. Metric bricks, known as modular bricks, have a nominal size of 20 cm × 10 cm × 10 cm, which includes mortar thickness. The actual size, excluding mortar, is 19 cm × 9 cm × 9 cm.
A brick mould is a rectangular box, usually made of wood or steel, with open ends, top, and bottom, allowing for easy release of the moulded brick. The internal dimensions of the mould are 20 cm × 10 cm × 10 cm.
1. Hand Moulding
Hand moulding is classified into two methods: ground moulding and table moulding.
(i) Ground Moulding
In ground moulding, the bricks are shaped on a prepared, level surface covered with a thin layer of sand. The mould is moistened, placed firmly on the ground, and filled with clay. The moulder dashes clay into the mould to ensure it fills the corners, pressing it in to avoid air gaps. Excess clay is removed using a wooden or metal strike, and the mould is lifted, leaving the brick on the ground to dry.
This technique allows a moulder to produce around 750 bricks per day. Ground moulding yields two types of bricks:
- Slop-moulded bricks, where the mould is dipped in water before each use.
- Sand-moulded bricks, where sand is sprinkled on the mould sides.


(ii) Table Moulding
Table moulding is conducted on a sturdy table measuring approximately 2 m × 1 m × 0.7 m. This method is similar to ground moulding, but it introduces a frog—a depression about 10–20 mm deep—on the brick. The frog serves as a key for mortar and can bear the manufacturer’s trademark.
In table moulding, the mould fits over a stock board on the table. The moulder fills it with tempered clay, and after excess clay is removed, a pallet board is placed on top. The mould and pallet board are lifted together, allowing the brick to remain on the pallet. Another pallet is placed on top for transport to the drying area.
2. Machine Moulding
Machine moulding is ideal for producing large quantities of bricks in a shorter time than hand moulding. Machine-moulded bricks tend to be heavier, stronger, and have more precise shapes, smoother surfaces, and sharper edges compared to hand-moulded bricks. Machine moulding can be done using either the plastic method or the dry method.
(i) Plastic Method
In the plastic method, bricks are made from pugged earth (earth that has been mixed to a plastic consistency). The machine used for this method has a rectangular opening, designed to match the length and width of the brick. When the pugged earth is pushed through the machine, it emerges in the form of a long bar. This bar is then cut into brick-sized pieces using wires that are positioned in a frame. These bricks are referred to as wire-cut bricks due to the way they are sliced into shape.
This method is quick and economical and results in bricks with consistent size and shape.
(ii) Dry Method
In the dry method, the machine begins by grinding hard earth into a fine powder. A small amount of water is added to the powder to form a stiff plastic paste. This paste is then placed in a mould within the machine, where it is pressed to form pressed bricks with precise shapes. These bricks have a high density, smooth surface, and uniform size.
A unique feature of the dry method is that the bricks do not require a separate drying phase and can be sent directly to the burning or firing section. However, due to the high pressure involved, pressed bricks need to be carefully fired to prevent cracking.
Both methods offer efficient and consistent results, allowing for the large-scale production of durable and uniform bricks suitable for various construction needs.
Drying of Bricks
Moulded bricks cannot be burned immediately, as they may crack or warp due to rapid moisture loss. Thus, they undergo a drying phase to gradually remove moisture. This can be done through natural drying or artificial drying, with the drying period typically lasting about two weeks.
1. Natural Drying (Hack Drying)
Natural drying involves placing the moulded bricks in rows on their edges on slightly elevated ground known as a hack. Small spaces are left between the bricks to allow air to circulate. These bricks are covered to avoid direct exposure to the sun and to protect them from rain. Air- and sun-dried bricks gain sufficient strength for use in smaller structures.

2. Artificial Drying
For continuous or large-scale production, artificial drying is preferred. In this process, bricks are dried in special dryers heated by furnaces. Alternatively, hot flue gases from kilns or waste steam from engines can be used. Artificial drying ensures that moisture content in green bricks, which can range from 7–30%, is reduced to about 3%, which helps control shrinkage, saves fuel, and reduces burning time.
Bricks lose moisture through two main types of artificial dryers:
- Hot Floor Dryers: These dryers are heated by a furnace or exhaust steam and are commonly used for drying fire bricks, clay pipes, and terracotta.
- Tunnel Dryers: Tunnel dryers use steam pipes, hot air from cooling kilns, or fuel-heated tunnels. They are more economical than floor dryers, and the temperature inside rarely exceeds 120°C. Drying time in these dryers varies from one to three days.
In many developing countries, bricks are usually dried in open-air dryers. They are stacked on raised ground and shielded from harsh weather and direct sunlight, with around 1.0 m of space between adjacent stacks for easy worker movement and efficient air circulation.
Burning of Bricks
Burning is an essential stage in brick-making, as it hardens the bricks, enhances their strength, and increases their density, which reduces water absorption. The burning process involves both physical and chemical transformations within the brick material, occurring in several stages.
Stages of Brick Burning
1. Water Smoking Stage (Dehydration)
- This initial stage removes the residual moisture retained after drying. As temperatures rise:
- Water in the clay pores evaporates, and the clay loses its plasticity.
- Some carbonaceous material burns off, and pyrite-derived sulfur partially distills.
- Hydrous minerals like ferric hydroxide lose water, and carbonate minerals start to decarbonate.
- Importance of Controlled Heating: If heating is too rapid, bricks may crack or burst. On the other hand, slow heating, especially with sulfur-rich coal, can create a scum on the surface due to alkali or sulfur reactions.
2. Oxidation Period
- In this stage, remaining carbon is oxidized, and iron transforms from ferrous (Fe²⁺) to ferric (Fe³⁺) forms.
- Complete oxidation is crucial to avoid black or spongy cores in bricks. Sulfur, which competes with oxygen for iron, delays this process if not fully eliminated.
- Role of Sand: Adding sand to clay helps create a more open structure, allowing gases to escape during burning.
3. Vitrification Period
- This stage involves fusing the clay particles into a glassy, dense structure. Temperatures vary based on the clay type:
- Low-melting clays are heated between 900–1,100°C, while high-melting clays require 1,000–1,250°C.
Sub-stages of Vitrification:
- Incipient Vitrification: Clay particles adhere without closing pores.
- Complete Vitrification: Maximum shrinkage occurs, creating a strong, dense brick that is non-scratchable.
- Viscous Vitrification: Further heating softens the mass into a molten state, causing shape loss and a glassy finish after cooling.
Cooling Requirements:
Careful cooling below cherry-red heat is necessary to prevent cracking.
Types of Kilns Used for Burning
1. Clamp (Open Kiln)
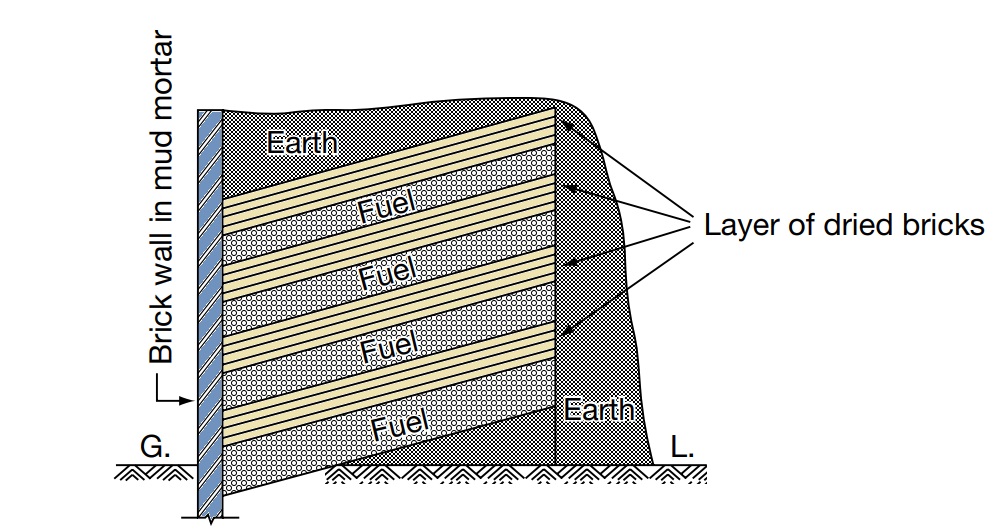
- Structure: A temporary kiln where dried bricks are stacked in alternating layers with fuel (e.g., wood, rice husk, dried cow dung).
- Process: After stacking, the lowest fuel layer is ignited, and the top and sides of the clamp are coated with mud and cow dung to retain heat. Bricks are gradually loaded during burning.
- Production & Duration: Clamps can yield around 200,000–300,000 bricks per cycle, taking about six months.
- Advantages: Low setup and fuel costs, no need for permanent structures or skilled labor.
- Limitations: Only about 60% of the bricks are of first-class quality due to uneven heat circulation, which can impact consistency.
This traditional method is economical and suitable for small-scale production, especially where local materials are readily available. However, regulated kilns offer better quality control for larger production demands.
2. Intermittent Kiln
For larger-scale, higher-quality brick production, intermittent or continuous kilns are preferred. In intermittent kilns, the burning process is carried out in separate stages, making it a discontinuous operation. This method is especially useful when a significant quantity of bricks with consistent quality is required.
Structure and Operation
- Design: Intermittent kilns are typically rectangular with thick outer walls, built above ground. Trenches run across the kiln floor, with small openings between them to allow for airflow.
- Loading and Layout: Sun-dried bricks are stacked on edge with gaps between them, allowing the hot flue gases to circulate and reach each brick evenly.
- Heating and Airflow: Hot flue gases enter through small openings along the kiln’s longitudinal walls. Dampers in these openings help regulate airflow, keeping flues circulating for about 3–4 days to ensure even heating.
- Cooling and Unloading: After firing, the bricks are left to cool for about a week. Once cooled, they are unloaded, and the kiln is reloaded for the next cycle.
Efficiency Considerations

- Fuel Usage: Since the kiln walls and floor cool down between cycles, they need to be reheated with each firing, leading to increased fuel consumption. This method is less fuel-efficient than continuous kilns, where walls stay hot throughout operations.
- Output Quality: Intermittent kilns produce high-quality bricks with better consistency in firing, making them suitable for projects requiring uniform brick strength and appearance.
Intermittent kilns are effective for medium- to large-scale brick production where control over brick quality is important, though the stop-and-start process leads to slightly higher fuel costs due to cooling and reheating between each cycle.
3. Continuous Kilns
In continuous kilns, the burning process proceeds without interruption, providing a constant supply of finished bricks. Continuous kilns are more fuel-efficient and produce a higher output than intermittent kilns. The three main types of continuous kilns are:
- Bull’s Trench Kiln
- Tunnel Kiln
- Hoffman’s Kiln
(i) Bull’s Trench Kiln
The Bull’s Trench Kiln is widely used, especially in countries like India, due to its simplicity and cost-effectiveness.
Structure and Layout:
- This kiln is typically oval-shaped and built in a trench, which can be fully underground or partly above ground. The trench is about 2 meters deep, lined with outer and inner walls constructed of bricks.
- Flue holes are positioned along the outer walls to provide controlled ventilation, and dampers are used to section off parts of the kiln, aiding in temperature regulation.
Operating Process:
- Bricks are stacked in sections, with gaps to create flues where fuel is placed. The top of the stack is covered with earth and ashes, which prevents heat from escaping.
- Fuel is added through the flue holes, and additional fuel can be introduced through the top openings during the burn.
- The kiln uses two movable chimneys to create a draft that directs the flow of hot gases. These chimneys are moved ahead of the active section, allowing the heat from the burning section to preheat bricks in the upcoming section, improving fuel efficiency.
Cycle of Operations:
- Simultaneous Phases: Loading, burning, cooling, and unloading occur in different sections simultaneously, allowing a continuous production cycle.
- Advancement of Fire: Once burning in one section is complete, flue holes are sealed to retain heat while the bricks cool down gradually. The fire then advances to the next section, and the chimneys are shifted forward.
Advantages:
- Efficient fuel consumption due to heat transfer from one section to the next.
- Continuous brick production with minimal interruption.

The Bull’s Trench Kiln is particularly valued for its ability to maintain a steady output of bricks with lower operational costs, making it one of the most commonly used kilns in regions where economic and steady brick production is needed.
(ii) Tunnel Kiln
The Tunnel Kiln is designed as a long, continuous tunnel through which bricks move on trolleys. This kiln is highly efficient and allows for controlled heating, yielding high-quality bricks.
Structure and Layout:
- The tunnel can be straight, circular, or oval in shape. The fire zone remains fixed at one location within the tunnel, while bricks move through the kiln on a conveyor or series of trolleys.
Operating Process:
- Loading and Movement: Freshly molded bricks are placed on trolleys and loaded at one end of the tunnel. These trolleys move continuously through the tunnel toward the other end, passing through different temperature zones.
- Heating Phases: As the bricks approach the fire zone, they first undergo drying and pre-heating, removing any residual moisture.
- Burning: When the trolleys reach the fire zone, the bricks are subjected to the necessary high temperatures for proper firing, achieving the required hardness and strength.
- Cooling and Unloading: After burning, the bricks move further along the tunnel to a cooling zone. Here, they cool down gradually before being unloaded at the end of the tunnel.
Advantages:
- Temperature Control: Precise temperature control in different zones allows for consistent quality and reduces the risk of defects.
- Efficiency and Economy: The continuous movement and uniform heating make Tunnel Kilns more economical compared to other types, as they optimize fuel usage and enable large-scale production.
The Tunnel Kiln is ideal for producing a high volume of quality bricks in an efficient, cost-effective manner. Its continuous operation with controlled temperatures also reduces waste and enhances the strength and durability of the final product.
(iii) Hoffman’s Kiln
The Hoffman’s Kiln is a large, circular kiln designed for continuous, large-scale brick production. It features a unique structure and airflow system to maximize efficiency, allowing for continuous operation and high-quality brick output.
Structure and Layout:
- Circular Shape: The kiln is circular in design, with a central chimney surrounded by 12 annular chambers.
- Components of Each Chamber:
- Main Door (e.g., D1): Used for loading and unloading bricks.
- Communicating Doors (e.g., A1, B1): These doors allow the flue gases to flow from one chamber to the next.
- Radial Flues (e.g., F1): Each chamber has a flue that leads to the central chimney, directing the exhaust gases.
- Fuel Holes: Powdered coal is commonly used as fuel, and it’s supplied through fuel holes in each chamber.
Functioning of Chambers:
- Chamber 1: Loading
- Chambers 9–12: Drying and pre-heating of bricks
- Chambers 7 and 8: Burning stage
- Chambers 3–6: Cooling phase
- Chamber 2: Unloading

Operating Process:
- Airflow and Heating:
- Cool air enters through the open doors of Chambers 1 and 2 and crosses through the cooling chambers (3–6).
- By the time it reaches the burning chambers (7 and 8), it’s pre-heated.
- The air then moves through Chambers 9–12 to dry and pre-heat the raw bricks.
- Finally, the air exits through the damper of Chamber 12 and the chimney, releasing minimal pollution.
- Continuous Brick Processing:
- The kiln operates continuously, with loading, burning, cooling, and unloading occurring simultaneously across different chambers.
- Airflow and Heating:
Advantages of Hoffman’s Kiln:
- Uniform Brick Quality: The regulated heating process ensures that bricks are evenly burned, resulting in high-quality output.
- Year-Round Operation: The closed-top design protects the kiln from weather, allowing continuous production in all seasons.
- Fuel Efficiency: Pre-heating the raw bricks with the hot exhaust gases conserves fuel, making the process more economical.
- Reduced Pollution: Since exhaust gases are filtered through the chimney, there is minimal black smoke or dust, reducing air pollution.
The Hoffman’s Kiln is widely valued for its consistent production, fuel economy, and capability to produce high-quality bricks in large quantities, making it suitable for industrial-scale brick production.