Table of Contents
ToggleIntroduction to Compass Surveying
Compass surveying is a specialized field within the broader discipline of land surveying. This method involves determining the directions of survey lines using a compass, while measuring their lengths through direct surface techniques such as chaining or taping. It’s particularly useful for covering larger areas or terrains with varied topography.
When surveyors are faced with small-scale projects that demand high precision, chain surveying is often the preferred approach. However, compass surveying comes into its own when dealing with expansive landscapes or areas with significant elevation changes. The compass’s ability to quickly establish directional bearings makes it an efficient tool for surveying larger tracts of land.
Before opting for a compass survey, it’s crucial to assess the area for potential magnetic disturbances. These disturbances can significantly affect the accuracy of compass readings, potentially compromising the entire survey. Factors such as nearby metal deposits, power lines, or other sources of electromagnetic interference must be taken into account.
The choice between compass and chain surveying ultimately depends on the project’s specific requirements, including:
- Size of the area to be surveyed
- Desired level of accuracy
- Terrain characteristics
- Presence of magnetic disturbances
- Time and resource constraints
Given the importance of compass surveying in tackling larger and more diverse terrains, surveyors must be well-versed in the various types of compasses available for their work. Each type of compass offers unique features and advantages, making them suitable for different surveying scenarios and requirements.
Types of Surveying Compass
Surveying compasses are of the following two types :
1. Prismatic Compass
2. Surveyor’s Compass
1.Prismatic Compass
The prismatic compass stands out as a premier surveying tool, renowned for its versatility and accuracy. Typically housed in a circular enclosure measuring approximately 100 mm in diameter, this instrument offers the flexibility of handheld operation or tripod mounting, ensuring precise positioning over ground station markers.

Key Components and Design of Prismatic Compass
- Compass Box:
- This is the main body of the compass, shaped like a round container.
- It’s about 100 mm wide (about 4 inches), making it easy to hold.
- The box protects all the important parts inside.
- Magnetic Needle:
- This is like a thin, flat magnet that can spin freely.
- It’s attached to a light, round ring made of aluminum.
- The needle always points to magnetic north, like a regular compass.
- Graduated Ring:
- This is a circular scale attached to the magnetic needle.
- It has numbers and marks going all the way around.
- The numbers go from 0 to 360 degrees, showing all directions.
- Interestingly, the numbers are written backwards (we’ll explain why later).
- Pivot:
- This is a sharp point in the center of the compass box.
- The magnetic needle and ring balance on this point, allowing them to spin easily.
- Object Vane:
- This is like a sight on one side of the compass.
- It has a thin vertical line (or hair) that you line up with what you’re looking at.
- Some compasses have a little mirror here that can tilt, helping you see things that are very high up or low down.
- Eye Vane (or Sight Vane):
- This is on the opposite side from the object vane.
- It has a small slit you look through, like aiming a gun.
- There’s a special prism attached to this part (more on that next).
- Prism:
- This is a piece of glass shaped like a triangle.
- When you look through it, it bends light in a special way.
- It lets you see the numbers on the graduated ring while you’re looking at your target.
- The prism also makes the backward numbers look normal and bigger, so they’re easier to read.
- Glass Cover:
- This is a clear lid that goes over the top of the compass box.
- It keeps dust and dirt away from the delicate parts inside.
- Lifting Mechanism:
- When you close the object vane, it pushes on a small lever.
- This lever lifts the magnetic needle off the sharp pivot point.
- This protects the needle and pivot from damage when you’re not using the compass.
- Brake Pin:
- This is a small pin you can push to stop the needle from swinging around too much.
- It helps you get a steady reading when the needle keeps moving.
- Sun Glass (or Dark Glass):
- This is a special tinted glass you can use when it’s very bright outside.
- It cuts down on glare, making it easier to see what you’re aiming at.

Operational Principles of Prismatic Compass
When you use the prismatic compass, you look through the eye vane at your target, lining it up with the object vane. As you do this, the magnetic needle stays pointing north, but the graduated ring turns with the compass box. The prism lets you see the number on the ring that lines up with the north-pointing needle. This number tells you the direction (or bearing) of your target. Following steps demonstrates how it all works together:
- Setting Up:
- First, you either hold the compass steady in your hand or mount it on a tripod.
- If using a tripod, you carefully center the compass over the exact spot you’re measuring from.
- Preparing for Sighting:
- Open the object vane and eye vane so they’re standing upright.
- If it’s very sunny, you might lower the sun glass to reduce glare.
- Taking a Sight:
- Look through the slit in the eye vane.
- Rotate the entire compass until the vertical hair in the object vane lines up exactly with your target.
- Hold the compass as still as possible during this process.
- Reading the Bearing:
- While keeping the target aligned, look down through the prism.
- You’ll see the graduated scale reflected and magnified.
- The number that appears in line with the prism’s hairline is your bearing.
- Fine-tuning the Reading:
- If the needle is swinging too much, gently press the brake pin to steady it.
- For very precise readings, you might take multiple sights and average them.
- Special Situations:
- For targets that are much higher or lower than eye level, use the adjustable mirror on the object vane.
- Tilt the mirror to bring the target into view without moving the compass body.
- Recording and Moving On:
- Note down the bearing you’ve read.
- You might also record the reverse bearing by adding or subtracting 180° from your reading.
- Closing Up:
- When finished, close the vanes carefully.
- This activates the lifting mechanism, protecting the needle and pivot.
2.Surveyor Compass
The Surveyor’s Compass, as its name suggests, has been widely used in surveying work. Although it has been largely replaced by the more compact and handy prismatic compass, understanding its construction and operation remains valuable. Here’s a detailed description of the Surveyor’s Compass.


Construction and Key Components:
- Compass Box: A circular container housing the main components.
- Graduated Ring: Unlike the prismatic compass, the graduated ring is directly attached to the circular box, not to the magnetic needle. This ring is marked with cardinal directions and degree measurements.
- Magnetic Needle: An edge bar type needle that floats freely over a pivot. It’s not attached to the graduated ring, allowing independent movement.
- Pivot and Jewel Bearing: Supports the magnetic needle, allowing smooth rotation.
- Sight Vanes:
- Eye Vane: A simple metal vane with a fine sight hole, differing from the prism arrangement in a prismatic compass.
- Object Vane: Used for aligning with the target. Unlike some prismatic compasses, it doesn’t include a mirror for sighting elevated or depressed objects.
- Glass Top: Protects the internal components.
- Lifting Mechanism: Includes a lifting lever and pin to protect the needle and pivot when not in use.

Graduation System and Reading:
- Quadrantal System: The ring is graduated in a quadrantal system, with 0° marked at both North and South ends, and 90° at East and West ends.
- Reversed East-West Markings: The east and west markings are interchanged from their normal positions to facilitate reading bearings in the proper quadrant.
- Reading Against North End: Bearings are read against the north end of the needle, unlike in some prismatic compasses where readings are taken from the south end.
Operation and Use:
- Setting Up: The compass is positioned over the survey point.
- Sighting: The surveyor looks through the eye vane’s sight hole and aligns the object vane with the target.
- Reading: As the compass box is turned, the graduated circle moves, but the needle continues to point north. The bearing is read where the north end of the needle points on the graduated circle.
- Quadrant Identification: The reversed E-W markings help in correctly identifying the quadrant of the bearing (NE, SE, SW, NW).
Difference Between Prismatic Compass and Surveyor Compass
| Feature | Surveyor's Compass | Prismatic Compass |
|---|---|---|
| Magnetic Needle | Edge bar type, acts as index | Broad needle type, not an index |
| Graduated Ring |
- Attached to box, rotates with line of sight - Quadrant Bearing (Q.B.) system - 0° at N and S, 90° at E and W - E and W interchanged - Erect graduations |
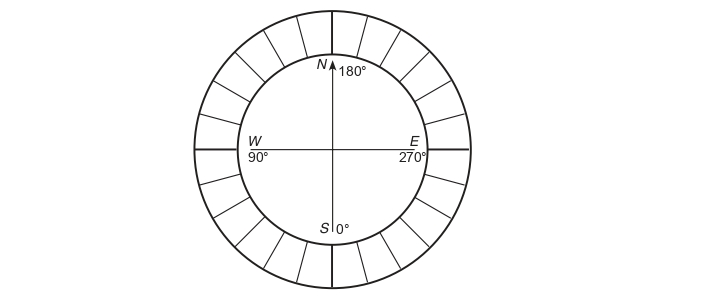
- Attached to needle, doesn't rotate with line of sight - Whole Circle Bearing (W.C.B.) system - 0° at S, 90° at W, 180° at N, 270° at E - Inverted graduations |
| Sighting Vanes |
- Object vane: Metal with vertical hair - Eye vane: Small with fine slit |
- Object vane: Metal with vertical hair - Eye vane: Metal with larger slit and prism |
| Reading System |
- Direct reading through top glass - No simultaneous sighting and reading |
- Reading through prism - Simultaneous sighting and reading possible |
| Tripod Use | Required | Optional (can be handheld) |
| Versatility | Less versatile due to tripod requirement | More versatile, suitable for various field conditions |
| Accuracy and Ease of Use | Stable but less convenient for reading | Quicker readings, easier field operation |